To unpack the archive you can simply right-click on your downloaded file and check if there’s the “unpack” option. If there is, just choose it and unpack the files from the archive to your brushes folder. If you can’t see that option, it’s possible that you don’t have any compression software and you have to install one. Anything compressing into .zip files will do.
Adding brushes
In all versions of Photoshop the ways of adding brushes are similar.
How to add brushes without starting Photoshop.
This is the fastest way You just have to copy your brushes (.abr files) into the Photoshop brushes folder: Program Files > Adobe > Photoshop (7.0 CE or CS or CS2 etc.) > Presets > Brushes. Then your new brushes will load automatically when starting Photoshop. You can find them from menu panel in Brushes window and you can choose to add brushes to existing ones (click Append) or replace them (click OK).
 If you copy .abr files while working in Photoshop, they’ll appear the next time you start the software.How to add brushes when Photoshop is open?You just have to load them.
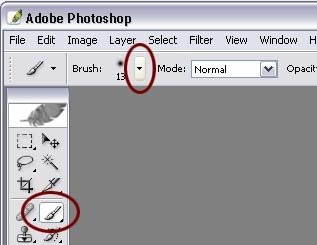
1. Choose the Brush Tool and then click on the down-arrow to open the Brush Preset picker.
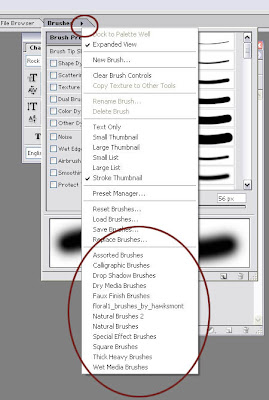
 2. Click on a small right-arrow in the upper-right corner of the box. Another menu panel should appear. Choose Load Brushes and locate on your computer brushes you’d like to add. Open the .abr file and now your new brushes set is ready to use. There is the second way of adding brushes in Photoshop. Actually it’s just another place, cos the way is similar.
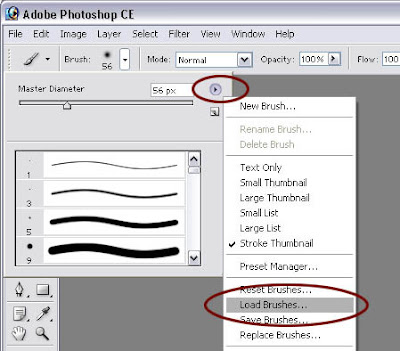
 You can open Brushes window (usually it is open by default in the upper-right corner of the Photoshop workspace). Then choose a small arrow next to Brushes and Load Brushes.
Hiç yorum yok:
Yorum Gönder